card
Keyboard Shortcuts
Workarea
Text Editor
Connecting Cards
Connect two cards with click and hold on a card until the cursor changes. Then drag to another card.
Moving Cards
Custom keyboard shortcuts
Note that you can also create custom keyboard shortcuts for any other common action item: Create keyboard shortcuts for apps
| Keyboard Shortcut | Command |
| ↑↓←→ | select card in direction of arrow |
| ⌘-↑↓←→ | insert (connected) card in direction of arrow (as applicable) |
| ctrl-⌘-↑↓←→ | move card into direction of arrow (if applicable) |
| ⌫ | Delete selected/hovered over card or delete hovered over connection |
Text Editor
| Keyboard Shortcut | Command |
| ↩︎ | enter and exit cards text editor |
| ⌥-↩︎ | Insert line break within card text editor |
| ⌘-←→ | Move cursor to start/end of text within text editor |
| ⌥-←→ | Move cursor after next word in within text editor |
| esc | Cancel editing text of card |
| ⌘-B | Make selected text Bold. Also See menu Editor > Style. |
Connecting Cards
Connect two cards with click and hold on a card until the cursor changes. Then drag to another card.
| Keyboard Shortcut | Command |
| esc | Cancel while connecting cards |
| ⌥ | Make connection with alternate style |
Moving Cards
| Keyboard Shortcut | Command |
| esc | Cancel while moving cards |
Custom keyboard shortcuts
Note that you can also create custom keyboard shortcuts for any other common action item: Create keyboard shortcuts for apps
Table Groups
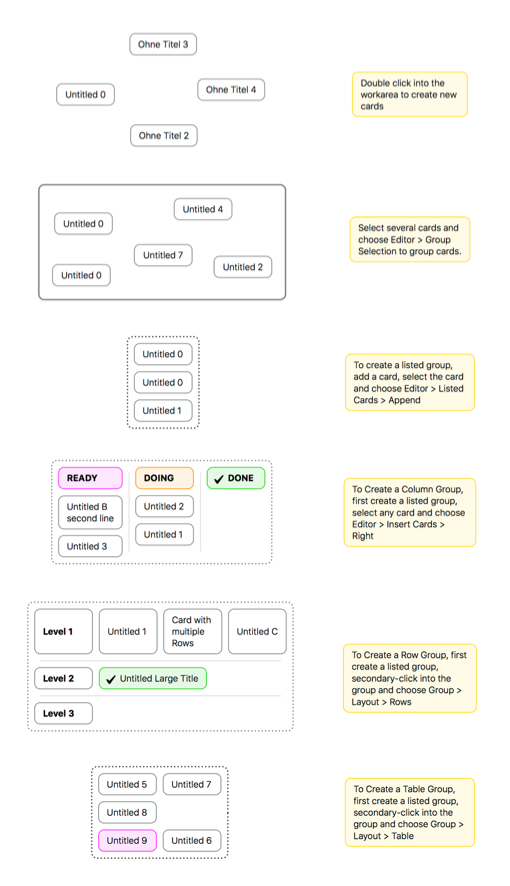
Table Groups arrange cards in layouts like columns, rows and tables. With Table Groups it's easy to set up Kanban boards, level layer boards and something like contingency or cross tables.
To create a table group organised in columns, double click the work area to create a new card. Then choose Editor > Group > Append Listed Card. You'll notice two cards stacked on each other. That is what is also known as listed cards. Then choose Editor > Insert > Right (or sure, any other direction). You'll notice a group with the dimension of 2x2. Again choose Editor > Insert > Right to reach the dimension of 3x3.
To move cards either use the menu commands or just drag them around.
To insert cards, either append them using menu commands or double click the spot where you want to insert a card. This can also be inbetween two cards.
To move cards between groups, Edit > Cut a card, click onto the location in the other group where you want to insert the card and Edit > Paste.
To change the type of table groups into columns, rows or table, right click on a group to open the context menu. Then choose from Group > Layout any of the types columns, rows, table.
The following shows more visual examples on what you can do with this feature:
Difficulties between moving and connection gestures
Moving or connecting cards are two straightforward gestures:
Move: Simple click on a card and immediately start dragging it.
Connect: Simple click on a card and hold until the arrow cursor turns into a open white cursor, then drag away the connection line.
It may be that you need to practice a bit if you find this a bit tricky. The click and hold duration for connecting cards is based on the system setting for the so called "double click" delay, that is the time in finder that recognizes clicking a folder twice top open it. (slow clicking twice on a folder will do nothing, faster clicking will open it)
The "double click" time duration can be set in system preferences: Apple () menu > System Preferences > Universal Access > Mouse & Trackpad > Double Click Speed.
You may increase the time duration until you feel comfortable with it in Big Hairy Goal and Finder double clicking.
➤ OS X El Capitan: Mouse & Trackpad pane of Accessibility preferences
Basic Gestures
⁃ Add a card by double clicking at any location within this workspace.
⁃ Edit a selected card by pressing the keyboard return-key
⁃ Move a card by dragging the selected card.
⁃ Connect two cards with click and hold on a card until the cursor changes. Then drag to another card.
- Choose line style with right click on a connection line.
- Add Document, Image or web address cards by dragging anything into the workspace.
- Scroll the workarea using a MagicMouse, TrackPad or click and hold in the empty space until the cursor changes. Then drag around.
Open and explore an example document under the App menu Help > Open Example Document.
Learn more tips and features under Help > Big Hairy Goal Help